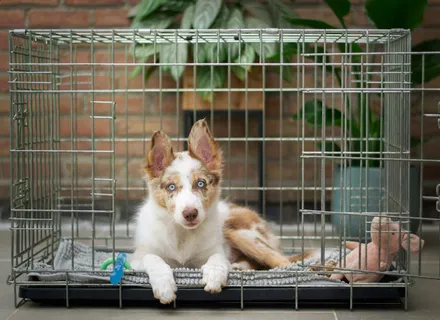
A crate-trained dog is a dog with options. They have a safe place that is genuinely theirs, they handle vet visits and surgery recovery without panicking, they travel better, they board better, and they sleep better at night. The catch is that crate training has a reputation problem. Done badly, crating is the worst kind of stressful confinement. Done well, it is one of the single highest-value training projects you can do, often in a couple of weeks. This guide walks through how to introduce a crate so your dog ends up loving it, what to do when things go sideways, and what realistic expectations look like across puppies and adult dogs.
Why Crate Train at All?
The objection that comes up most often is some version of “I work from home, I don’t need to confine my dog.” The point of crate training is not primarily daily confinement. It is the ability to confine your dog without it being a crisis. The situations where that matters:
- Vet visits and surgery recovery: Dogs recovering from spay, neuter, orthopedic, or dental surgery often need 7 to 14 days of strict rest. A dog who has never been crated and is suddenly confined while in post-anesthesia distress is a much harder dog to recover.
- Boarding and travel: Almost every boarding facility, kennel, and pet-friendly hotel uses some form of confinement. A crate-positive dog handles these without separation anxiety stacking on top.
- House guests and contractors: Sometimes you just need your dog out of the room for an hour.
- Emergency situations: Floods, fires, vet emergencies, and unplanned moves all go better with a dog who can be safely contained.
- Adolescent decision-making: A safe space to send a dog who is hyper-aroused, overtired, or just being a teenager is one of the most useful tools an owner has.
- House training and supervision: A young dog who cannot be watched constantly is often safest in a crate for short stretches, which dramatically accelerates house training.
A crate is a long-term investment with a short training cost.
What Kind of Crate Should You Buy?
There are four main types, and the right choice depends on your dog and how you’ll use it:
- Wire crates: The most versatile and the easiest to start with. Good visibility, foldable, and most come with a divider so a puppy crate grows with the dog. The downside is sound and that anxious dogs can sometimes injure themselves on the bars.
- Plastic airline-style crates: More den-like, often calming for sound-sensitive or anxious dogs. Required for most air travel. Less ventilation in summer.
- Heavy-duty crates: Reinforced steel crates for the small percentage of dogs who can damage or escape wire crates. A last resort, not a starting point.
- Soft-sided crates: Convenient for travel and camping. Not appropriate for un-trained dogs or chewers, since they can be unzipped, scratched through, or collapsed.
Sizing
The crate should be just big enough for your dog to:
- Stand fully without ducking
- Turn around in a circle
- Lie down stretched on their side
Larger than that, especially for puppies, gives them room to soil one end and sleep in the other, which undermines house training. For growing puppies, buy the adult-size crate with a movable divider, and adjust as they grow.
Placement
Place the crate in a part of the home where the family already spends time, not a basement or laundry room. Dogs are social and isolation is the part of crating that breaks them. A living room corner, a bedroom, or a hallway with sight lines to the kitchen are good starting points. For overnight crating with a young dog, the bedroom is almost always the right answer for the first few weeks.
The Step-by-Step Crate Introduction
The single most important rule is to go at your dog’s pace, not the schedule’s. The whole protocol can run in 7 to 14 days for most dogs. Rushing it costs weeks of recovery, so don’t.
Day 1 to 2: Make the crate exist
Set the crate up with the door open or removed entirely. Drop a few high-value treats inside throughout the day. Let your dog explore on their own. Do not lure them in, do not close the door, do not say anything at all. The goal is to make the crate a normal piece of furniture that occasionally produces snacks.
Feed one or two meals near (not in) the crate.
Day 2 to 4: Feed inside
Move meals inside the crate. Start with the bowl just past the threshold. Each day, move it a few inches further back until your dog is comfortably eating with their whole body inside.
Door still open. No closing yet.
Day 4 to 6: Close the door briefly
While your dog is eating, gently close the door for just the last few seconds of the meal. Open it immediately when they finish, before they have a chance to want out. Repeat at the next meal, adding a few seconds each time.
Build up to your dog finishing their meal with the door closed, then resting calmly for a minute, before you open it.
Day 6 to 9: Crate games outside of meals
Now you can start asking for crate use outside of feeding. The cleanest method:
- Toss a treat into the crate
- When your dog goes in, mark with a “yes” and drop another treat
- Let them come out freely, no closing
- Add a verbal cue (“crate”, “bed”, “kennel”, pick one and stick with it) as they walk in
- Gradually start closing the door for short, calm intervals
Use frozen Kongs, lick mats, and chew toys to occupy your dog during longer crate sessions. The goal is for the crate to consistently predict good things.
Day 9 onward: Add duration and absence
Once your dog is comfortable inside with the door closed for 10 to 15 minutes while you are in sight, start adding distance. Walk into another room. Come back before they call you. Build duration incrementally:
- 15 minutes in sight
- 20 minutes with you in the next room
- 30 minutes with you elsewhere in the home
- 1 hour while you do quiet activities
- 1 hour while you step outside
- Longer stretches built up gradually
If your dog escalates in distress, you have moved too fast. Back up one or two steps and rebuild.
Crate Training a Puppy
Most of the protocol above applies, with three puppy-specific adjustments:
Use the crate for sleep from night one
Puppies do best in a crate beside your bed for the first few weeks. They can sense you, you can hear them, and night-time potty breaks are easier. Do not put the crate in another room and try to ignore distress, this is a key window for building safety associations.
Plan for night-time potty breaks
Young puppies cannot hold their bladder all night. Expect to get up once or twice for the first few weeks. Take the puppy out on a leash, no play, straight back to the crate. Our potty training guide covers the full overnight routine.
Match crate time to puppy bladder capacity
A rough rule of thumb is one hour per month of age, plus one, up to about five hours maximum during the day. An 8-week-old puppy should not be crated more than three hours; a four-month-old, no more than five. Overnight stretches build faster because they are less active.
Crate Training an Adult Dog
Adult dogs can absolutely learn to love a crate. The keys are patience and not assuming they have done this before:
- Treat every adult dog like a beginner. Even if they were “crate trained” at the shelter, that often meant tolerated, not loved.
- Adopt dogs from rescues often have crate associations that are mixed at best. Move slowly, and watch for early signs of distress.
- Older dogs with arthritis need extra padding. A standard crate pad may not be enough. Orthopedic crate mats are worth the upgrade.
- If a dog has a clear trauma response (frantic escape, broken teeth from bar chewing, soiled crate during attempts), bring in a behaviour professional before continuing.
What If Your Dog Hates the Crate?
A few common patterns and what to do:
Whining and barking that doesn’t fade
Short settling whimpers should fade in 5 to 15 minutes the first few nights. If your dog is escalating after 20 minutes, the crate is too aversive at that intensity. The fix is to back up to the level they were calm at, build positive associations through meals and chews, and progress slower.
Refusal to enter
You moved too fast somewhere earlier. Restart with the door removed entirely and food just inside the threshold. Most dogs are back to entering willingly within a week of a proper restart.
Soiling the crate
Most often a sign the crate is too big (move the divider in), the dog has been left longer than their bladder can handle, or there is an underlying medical issue. Rule out medical first.
Frantic distress, biting bars, broken teeth
Stop crating immediately and consult a behaviour professional. This pattern is often a sign of confinement-related panic or severe separation anxiety, which has its own protocols and which is covered in our post on separation anxiety in dogs.
Crate Training and House Training Work Together
A correctly sized crate is one of the most effective house-training tools available. Dogs naturally avoid soiling their sleep area, so a crate-trained puppy learns to hold their bladder more reliably. The pattern that works:
- Out of crate, take the puppy directly outside to potty
- Reward the right behaviour outside
- Brief, supervised play time in the home
- Back to the crate for a nap when energy fades or supervision is lost
- Repeat
Most puppies house train within 4 to 8 weeks with this routine. Adult dogs from inconsistent backgrounds often catch on within 2 to 4 weeks.
Common Crate Training Mistakes
A list of the patterns we see most often at intake:
- Using the crate as punishment: This destroys the positive association you are trying to build. The crate is a rest place, not a time-out zone.
- Closing the door on day one: A dog who has never been confined will panic. Open-door access for a few days is non-negotiable.
- Leaving the dog crated for full work days: 4 to 6 hours is the practical maximum for an adult dog during the day. Beyond that, you need a midday break, daycare, or a pet sitter.
- Caving to whining at the wrong time: Letting a dog out the moment they bark teaches them to bark longer next time. Wait for a brief pause before opening, even a 3-second one.
- Inconsistency between family members: Pick a verbal cue and rules everyone follows. Mixed signals double the learning time.
- Skipping crate training because the dog seems fine: Then surgery happens and the dog is suddenly confined and miserable. Train the skill before you need it.
How Pawlington Can Help
Crate training is one of the foundational skills we cover in private training. For families with puppies, we offer a starter package that includes crate training, potty training, and early socialization in a single coordinated plan. For boarding guests who are new to crate-style accommodations, we run a short acclimation protocol on the first day to ensure your dog is comfortable in their suite before the family leaves town.
If you have already tried crate training and it isn’t going well, that is a good time to call us before patterns harden. A 60-minute coaching session with one of our trainers can usually identify what’s stuck and reset the plan.
A crate-trained dog is a dog with options. Whether you use it daily, occasionally, or just want the skill in your back pocket for the next vet visit or boarding stay, the training is worth doing once and doing well. Reach out to our training team for a crate-training plan tailored to your dog, your home, and your schedule.